Thursday 31 March 2011

How to Create Animated 3D Stereo Photos

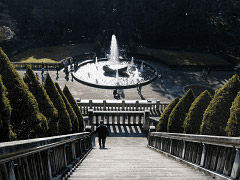
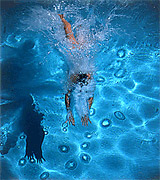
Stereo photography creates a single three-dimensional image using two ordinary 2D images. Although there's several ways to achieve this effect, most require 3D glasses and/or a special display device. This article focuses on a technique which requires nothing more than an ordinary digital camera and photo editing software. It works by combining two separate photos into a single animated image (often using the standard GIF format), as shown below. While this clearly isn't recommended for all your photos, it's certainly a fun trick to experiment with when you want to create a different look.

animated 3d staircaseanimated 3d swimmer
Move your mouse over each image above to see the 3D effect.
Images courtesy of StereoPhoto Maker (left) and Jim Gasperini (right).

OVERVIEW: 3D VISION & DUAL CAMERAS

Our eyes perceive depth (in part) because they see objects from slightly different perspectives. When viewed through either eye, foreground objects change position much more than objects in the background. Hold your finger out in front of you, focus on the background, and notice how this finger shifts from side to side when viewed through either eye (called "parallax"). Now, move this finger closer and notice how it appears to shift even more than before.
A standard stereo photograph simply mimics our eyes: it's comprised of two photographs which were taken at different positions. The greater the separation, the greater the 3D effect — and the greater foreground objects appear to shift relative to the background.
3d stereo camera on mars rover
3D/Stereo Camera on the Mars Rover - courtesy of NASA
However, a camera lens's angle of view is often different from our own eyes, so the separation distance may have to change accordingly. Other than that though, with most 3D techniques the real difference is in how the images are combined. However, this article discusses the one exception: animated "wobble" images.

HOW ANIMATED 3D "WOBBLE" IMAGES WORK

Instead of trying to mimic what each eye sees with a separate photograph, a wobble image works by mimicking what both eyes see when you focus on an object and move your head from side to side. Our brain then interprets how objects move relative to one another — and automatically translates this into a sense of depth.
3D animation frames 1 and 2 3d animated stone gate
Image 1Image 2Start AnimationStop Animation
image courtesy of Jim Gasperini
The key difference with wobble images is that both the foreground and background move substantially, while the middle/subject often remains stationary. In the example above, note how the central and right-most wooden posts remain in roughly the same position. This causes the image to appear as if it is rotating slightly when it wobbles.

STAGE 1: HOW TO CAPTURE THE STEREO PHOTOS

In order to create an animated 3D image or "wobble image," the capture technique is a little different from standard 3D images. Instead of capturing two images with parallel lines of sight, with a wobble image the lines of sight actually converge. This can be captured using the following steps:
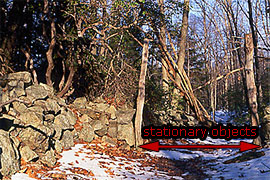
stationary objects in 3D wobble image
(1A) Identify a composition that spans near, middle and background objects. Avoid moving subject matter.
(1B) Choose the distance/object that will appear stationary for each camera position.
(1C) Capture the first photo, paying careful attention to the precise position of objects at the distance chosen in 1B.
(1D) Move your camera about ~4-12 inches* to the left, then rotate the line of sight slightly to the right (or vice versa), until objects from 1B are at the same place within the camera frame as they were in 1C. This is the trickiest step of the whole process and will likely take some practice.
*Notes on the displacement distance. You'll likely want to experiment with different displacements depending on your focal length, subject distance and on-screen display size:

 Required Displacement Distance
When focal length increases . . .Decreases
When subject distance increases . . .Increases
When viewing size increases . . .Decreases

Keep in mind that wide angle photographs are typically taken much closer to the subject (see "using wide angle lenses"). Closer subjects require less displacement, so in practice the displacement may not need to change much for wide angle vs telephoto lenses.

Often the easiest way to determine the displacement distance is to just move your camera back and forth until you're happy with the movement you're seeing in the viewfinder/LCD. Luckily you don't have to get it spot on. In extreme cases though, too little displacement can eliminate the 3D effect, while too much can make the animation appear as two different 2D images. Regardless, it's also a good idea to take more than two photographs so you can experiment with how larger/smaller displacements appear on your home computer screen.

STAGE 2: HOW TO CREATE THE 3D ANIMATED GIF IMAGE

The steps below are shown for Photoshop, but many other image-editing programs will also work. In general, your software just needs to support (i) layers and (ii) saving animated GIF files. There's also a free automated program called StereoPhoto Maker. Regardless, the general steps are as follows:
(2A) Paste one of the images as a second layer on top of the other image:
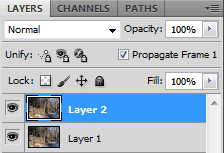
(2B) Change the top layer's opacity to 50% and nudge it so that the objects chosen in 1B are at the same position as the lower layer. Then change the top opacity back to 100%. This step isn't always necessary, but it helps minimize errors from 1D above.
 
Top layer is set to 50% opacity.The two vertical posts appear sharp (same position), whereas objects in front/behind these appear blurred (different positions).
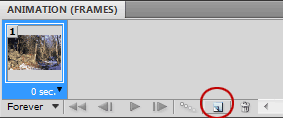
(2C) Open the animations window in Photoshop (Window > Animations). Then create a second frame for your animation by clicking on the button circled in red below.
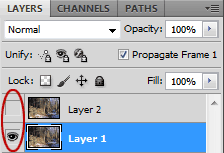
(2D) Select frame 1 and make sure that only the bottom layer is visible (by setting the eye icons as shown circled in red below), then select frame 2 and this time make sure that only the top layer is visible (or vice versa).
 
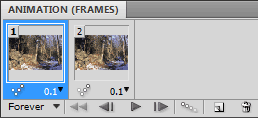
(2E) Set the delay time between frames. Animated stereo images usually appear best with a value of 0.1 seconds (as shown in the upper right image). You can now test your animation by clicking on the play button above.
(2F) Once you're happy with the effect, save the image as an animated GIF file by clicking on "File > Save for Web & Devices ..." and selecting GIF from the top right drop-down menu. You should now be able to see the 3D effect within any image viewer, email client or web browser.

ALTERNATIVE WAYS TO CREATE & VIEW 3D PHOTOS

There's several more sophisticated ways to combine and view 3D photos, although they don't have the universal viewing capabilities of the above "wobble image" example. The most popular methods include:
 stereo image pairStereogramred/blue 3d composite imagepolarized 3d composite image
Display as:Stereo
Image Pair
StereogramRed/Blue
Composite Image
Polarized
Composite Image
Viewable using:Cross FocusCross FocusRed/Blue 3D GlassesPolarized 3D Glasses
The above images are just to illustrate what each method looks like in 2D;
do not try to view these in 3D, since it won't work at this size and/or on your display.
  • Stereo image pair with cross focus viewing. This just requires placing each image side by side, and viewing these out of focus. When done correctly, each image appears as a double, but one image double from each original photo overlaps to form a central 3D image. However, this is also the most difficult and unnatural viewing technique to master.
  • Stereograms. These are slightly easier to view than a cross focus image pair, but they don't reproduce any colors in the 3D image.
  • Red/blue composite image viewable with red/blue 3D glasses ("anaglyph"). This is easy to view and is how older 3D movies were displayed, but colors don't always appear as natural as with the newer polarized 3D movies (below).
  • Overlaid polarized images viewable with polarized 3D glasses. This is now the standard for 3D movies and definitely produces the best results, but requires special glasses in addition to a sophisticated display device.
Fortunately, the primary difference with the above techniques is in how they're displayed/viewed — not necessarily in how they're captured. As long as you keep your two stereo images, you can often change how they're combined as technology improves.

F-Stop Stacking: Depth of Field & Corner Sharpness

Image stacking can be a powerful technique for improving the quality of a photograph. This tutorial discusses a technique which stacks images taken at different f-stops in order to overcome blurriness caused by diffraction and/or to improve corner sharpness — while also maintaining a vast depth of field. We refer to this as "f-stop stacking". It's perhaps most useful with landscape photography, and is also one of the easiest stacking techniques to implement.

EXTENDED DEPTH OF FIELD EXAMPLE

In a nutshell, here's how it works: several photos are taken at different f-stops, then a final composite is created using only the sharpest portions of each image. The result is a photo with an extended depth of field that looks natural, because sharpness still gradually decreases further from the focusing distance (but just not by as much):
Fairy Falls - Columbia River Gorge, Oregon, USA100% Crop at Focusing Distance:
100% Crop of Foreground Stones:
Final Image with Extended Depth of Fieldf/11f/22Extended DoF
Fairy Falls - Columbia River Gorge State Park, Oregon, USA.
The foreground pebbles are just 6-12 inches away from the camera's lens.
Images taken with a 21.1MP Canon EOS 5D Mark II and a 17-40 mm f/4L lens at 17 mm.
In the above example, note how the center appears sharper at f/11, but that the closer foreground stones appear much sharper at f/22. At some distance, objects in both the higher and lower f-stop photos will appear equally sharp. This is where you want to place the seam/blend between each image. In this example, note how the seam falls roughly halfway between the bottom of the frame and the base of the waterfall:
Fairy Falls - Columbia River Gorge, Oregon, USA 
Seam Between
f/11 and f/22 Photos
Seam Applied as a
Layer Mask in Photoshop
In order to blend each image in Photoshop, you will need to:
  1. Paste one photo on top of the other, as shown above (top right).
  2. Create a layer mask for the top photo (button circled in red above)
  3. Select the newly created mask (left click on this mask while holding the ALT key)
  4. Paint regions black that aren't as sharp as the bottom layer
The same general procedure works with just about any other image editing software that supports layers. Make the mask follow the natural contours of the image so that the seam isn't visible. In the example above, the seam follows the smooth water just above a row of pebbles.
The above waterfall example was fortunate enough to have a gradual upward blend from near to far objects; other photos might depict intertwined near/far objects, such as tree branches — resulting in a seam which is much more difficult to place. If your artistic intent allows for it, try to avoid complex subject layering if you plan on using the extended depth of field technique.

AUTOMATED SHARPNESS SELECTION

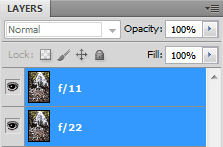
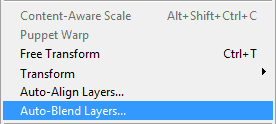
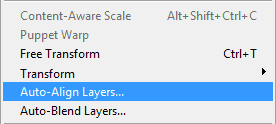
Alternatively, you can use specialized software to auto-select the sharpest regions of each photo (such as TuFuse, Helicon Focus, etc.). In Photoshop, this can be done by placing each exposure into a separate layer, then selecting "Edit > Auto-Blend Layers..." from the top menu, as shown below:
  
If your photos weren't taken on a stable tripod, you might first need to select the "Auto-Align Layers..." option above. Once the Auto-Blend process is complete, you'll be left with two layer masks as shown below.
 
Automated Photoshop ResultMask After Manual Editing
However, the running water in this example ends up tricking Photoshop. The longer exposure at f/22 makes the water appear smoother, so Photoshop mistakenly concludes that this water isn't as well focused as at f/11. Fortunately, both the f/11 and f/22 exposures are long enough that the water appears similar (otherwise the composite image might have water which appears uneven). Other subject matter can also be problematic, so it's always a good idea to check the result and to manually edit the mask if necessary. Simpler/motionless subject matter will often work flawlessly.
You can often achieve a more realistic looking depth of field by blending photos taken at more than two different f-stops. This is where Photoshop's Auto-Blend feature is most helpful. In the waterfall example, using an intermediate f-stop of f/16 improved results.

IMPROVE CORNER SHARPNESS

In the tutorial on camera lens quality, we saw that the center of an image always has the potential to produce the sharpest image (when properly focused), but that this sharpness decreases drastically toward the corners of a photo:
f/11: Image Center at 100%f/11: Extreme Corner at 100%
This corner softness is unrelated to depth of field; in fact, in the above example, the left and right photos depict objects which were about the same distance from the camera. Instead, this corner softness is entirely caused by how a lens is designed. For a given lens, the only way to reduce this edge softness is to use a higher f-stop. However, at really high f-stops, this increase in corner sharpness comes at the expense of sharpness at the image's center:
f/22: Image Center at 100%f/22: Extreme Corner at 100%
Move your mouse over either image above to switch it back to f/11 for a direct comparison.
Note how the extreme corner appears much sharper at f/22 — even though f/22 makes the center of the image appear much softer. However, results will vary depending on the particular camera and lens that you happen to be using. Be sure to experiment with different settings first. The biggest difference will likely be seen with ultra-wide angle lenses and in cameras without "cropped" sensor sizes.
To combine the images, just use either the manual or automatic image stacking techniques (that were described in the previous two sections above).

EXTREME DOF WHILE ALSO FREEZING SUBJECT MOTION

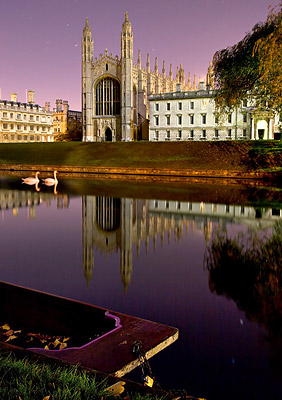
Night photo of Swans on the River Cam in front of Kings College, Cambridge
Example of frozen motion with Extended DoF
Kings College - Cambridge, England
Another use for the variable f-stop technique is with low-light photography, such as when one wants to freeze subject motion while also preserving sharpness throughout. In Cambridge, I always found it interesting when swans would glide along the river at night, but usually had difficulty capturing this in a photograph without using a flash.
In the example photo to the right, the camera was focused on the far side of the river. When the swans drifted by, the tripod-mounted camera first took an exposure at the lens's lowest f-stop (in this case f/2.8). This gave a relatively short exposure time of 0.5 seconds, which was fortunately brief enough to freeze the motion of the very slowly moving swans. Next, the camera's f-stop was increased to f/16 and a 16 second exposure was taken of the same scene. Each photo was then merged using layer masks, similar to the technique described above.
However, when using low f-stop values, the brightness near the edges of the frame can decrease ("vignetting"), which often creates problems with the extended depth of field technique. This can cause the combined multi-exposure photo to appear uneven and have abrupt changes in brightness. Just make sure to either (i) use a very gradual blend between each photo, or even better, (ii) to correct for vignetting prior to combining the exposures (using tools such as Adobe Photoshop's Camera RAW).

LIMITATIONS & ALTERNATIVES

F-stop stacking is a great tool, but it has one big disadvantage: it cannot extend depth of field any more than the highest f-stop setting of your lens. It's really just intended to prevent diffraction from softening the region of focus. Two excellent alternatives include:
  • Extending Depth of Field by Using the "Focus Stacking" Technique.
    This is more complicated because photos are never in alignment, but it has the potential to provide a virtually limitless depth of field.
  • Using Tilt Movements with a Tilt/Shift Lens to Reposition the Depth of Field.
    This can capture moving subjects, but is limited to situations where the subject lies along a wedge-shaped region.

Extending Depth of Field Using Focus Stacking

Focus stacking is a powerful technique for extending a photo's apparent depth of field. It's perhaps most useful in close-up and macro photography, since the camera lens's highest f-stop is often insufficient to render everything in focus. It can even overcome the otherwise unavoidable sharpness loss from diffraction. However, focus stacking is also quite a complicated technique to master. Continue reading to learn more about this powerful tool.

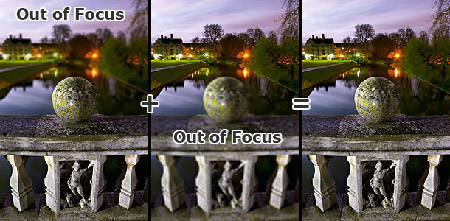
Extended Depth of Field Example - Clare Bridge, Cambridge, England
Photo taken under full moonlight atop Clare Bridge in Cambridge, England.
Two focusing distances were used: one for the sphere and the other for the background.

WHEN TO USE IMAGE STACKING

When a photographer requires more depth of field, they typically just increase the f-stop setting of their camera lens. While this is a simple and effective technique, choosing a higher f-stop also has its disadvantages. It increases the necessary exposure time, and in extreme cases, it can also reduce image sharpness due to diffraction. Furthermore, one might desire a greater depth of field than a particular lens's maximum f-stop is able to provide. Specific example scenarios may include:
Extended DoF Landscape Exampleshallow depth of field macro photograph of ants
Extended DoF Low-light Example
Landscape PhotographyMacro PhotographyLow-light Photography
  • Landscape photography: one may wish to obtain a vast depth of field, while also avoiding softness at the focal plane due to diffraction. This can enable a much larger and sharper print than otherwise possible.
  • Macro photography: one may wish to achieve a greater depth of field than otherwise obtainable using the lens's maximum f-stop (often f/22 or f/32 with SLR cameras).
  • Low-light photography: one may want to avoid a prohibitively long exposure time. Alternatively, one may wish to freeze motion in part of their image (such as with a moving subject), but also to preserve an expansive depth of field in other parts of the photo (without resorting to using a flash).
What's the solution? To combine several separate images (aka "image stacking"). This avoids many of the disadvantages of using too high an f-stop, while also retaining the advantage of a large depth of field. In this article, we'll focus on a type of image stacking that merges several photos which were taken at different focusing distances — producing a single, extended depth of field composite (aka "focus stacking"). In the second part of this tutorial we'll instead focus on stacking images taken at different f-stops.

OVERVIEW

Focus stacking works in three general stages:
stacked image capturealign/register stacked imagesmerge/blend stacked images
1. Capture 2. Align 3. Merge
  1. Several photos are taken by gradually incrementing the focusing distance across the subject. The number of separate photos ranges from a couple (for two distinct layers of subject matter) to as many as dozens (for expansive scenes). In general, moving subject matter should be avoided.
  2. These photos are then aligned so that their content is overlaid pixel by pixel. This step is necessary even when using a tripod, since changing the focusing distance always causes misalignment (more on this later).
  3. A composite image is then created based on the sharpest regions from each of these separate photos. If the subject is composed of only a few distinct layers (such as the sphere example above), then this can be performed manually using layer masks. Otherwise Adobe Photoshop CS4+ or specialized software packages such as Helicon Focus, TuFuse or CombineZM are required.

STAGE 1: CAPTURING THE PHOTOS

The most important decision with focus stacking is choosing how many photos to take. This is influenced by the following factors:
 Required # of Stacked Photos
When the # subject layers increases . . .Increases
When the f-stop increases . . .Decreases
When subject magnification increases . . .Increases
When print/image size increases . . .Increases
In other words, all of the same principles which apply to depth of field also apply here. If your subject spans a large distance and you plan on making a large print, you'll need a high f-stop to achieve sufficient depth of field. The only difference is that now you have one more dial under your control: the number of stacked images. For example, now you can get away with a lower f-stop if you just stack more images (or vice versa).
One could estimate the number of photos from a formula, but it's probably best to instead develop an intuition for how many you'll need. If you almost had enough depth of field without focus stacking, start by stacking just 2-3 images with evenly spaced focusing distances across your subject, then see how this looks. The key is to experiment a lot when starting out. In the example below, one can see that three photos will be sufficient as long as the image isn't displayed any larger than it is shown here:
Extended Depth of Field - Near Focus ImageExtended Depth of Field - Middle Focus ImageExtended Depth of Field - Far Focus Image
Near FocusMiddle FocusFar Focus
Note: Above photos have been pre-aligned to make the depth of field easier to compare.
Before alignment, the left image was slightly larger than that in the middle and right images
(see stage 2 for more on this topic).
Optimal Focusing Distance Spacing. The key is to ensure that the depth of field for each subsequent photo overlaps with the depth of field from the prior photo. This way no softness will be present in the final composite. More closely spaced focusing distances often produce more consistent and natural looking sharpness, but this can take a lot longer to capture and requires more storage space, so try to avoid overdoing it.
Example of wave-like depth of field
Be extra careful to avoid the wave-like depth of field which can result from focusing distances which are too widely spaced (as shown in the example to the left). As you can see, if the above example used a lower f-stop, more images would need to be stacked. Also try using the camera's "live view" rear LCD feature for more consistent focus distance spacing. For advanced stacks, you might want to connect your camera to a laptop (if supported) so that you can see an enlarged preview and control the focusing distance precisely.
If your subject spans the entire distance from your camera to the distant background, then you'll need to ensure that you've chosen a span of focusing distances that renders all of this in sharp focus. In this case, the focus stacking technique really needs to be an all or nothing approach, otherwise subjects can be rendered with an unnatural and abrupt depth of field. The only time you can get away with just a few focusing distances is when your subject is composed of distinct layers (such as the sphere example at the beginning).
Optimal F-Stop. Using higher f-stop values allows for more sparsely spaced focusing distances, but this can also decrease the sharpness of the final image. It's generally a good idea to choose as high an f-stop as possible without inducing visible softening due to diffraction. If in doubt, values of f/11-f/16 often work great with SLR cameras.

STAGE 2: ALIGNING THE PHOTOS

Unlike extending the depth of field by varying the f-stop, varying the focusing distance causes each individual photo to become misaligned. This is because the effective focal length of a lens actually changes slightly when one alters the focusing distance (see tutorial on macro lenses & extension). As a result, the angle of view also changes — giving images the appearance of zooming in or out when focusing near or far, respectively:
Example of focusing distance versus angle of view
Closer Focusing Distance
(narrower angle of view)
Further Focusing Distance
(wider angle of view)
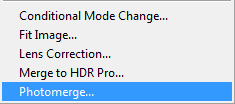
Special software therefore needs to re-align (aka "register") the separate images. Necessary software packages might include TuFuse, Helicon Focus, CombineZM or some combination of Adobe Photoshop's Auto-Merge and Auto-Align features. Fortunately, all of these produce very similar results when aligning images. In Photoshop, you can use either "File > Automate > Photomerge..." or "Edit > Auto-Align Layers..." as shown:
Photomerge... ← or → Auto-Align Layers...
photoshop photomerge/auto-align mode: collage
If you use Photomerge, then you can effectively perform stages 2 & 3 at the same time if you also check the box that says "Blend Images Together." If the photos were taken on a tripod (as they should be), then it's best to use the "Collage" option (shown on the right). If you're using another software package, this is equivalent to making sure that the software only repositions and resizes the images when aligning them.
If you use "Auto-Blend Layers," then you'll need to first ensure that all your photos are already pasted on top of each other as layers in Photoshop.

STAGE 3: MERGING & BLENDING THE PHOTOS

Merging the images requires determining which stacked photo contains the sharpest representation of each image region. In the example below, software was used to select and merge only the sharpest portions from each of the three focusing distances:
 
Focus:NearMiddleFar Sharpest Portion Final Composite
Unfortunately, image merging/blending quality can vary substantially depending on the image stacking software being used. With a simple subject that has well-defined layers (such as the above example), results will likely be similar. However, whenever the layers are irregular and highly intertwined, results can vary dramatically. You can always manually edit which photo contributes where, but this can be quite time consuming. It's therefore recommended that you first experiment with trial versions of whatever software you're considering.
In Photoshop, if you already used Photomerge to align the images in stage 2 above, then these photos may have already been merged if the "blend images together" box was checked. Otherwise you can blend these as follows:
(1) Select layered photos
stacked image layers
(2) Go to "Edit > Auto-Blend Layers..." using the top menu, then check "Stack Images." Result on right:
blend method: stack imagesstacked image layers with blending masks
You'll be left with layer masks for each stacked photo (far right image above), so all you have to do is flatten the image (select all layers and go to "Layer > Flatten Image") and you'll be left with a sharp, extended depth of field photo. Just in case though, make sure to closely inspect the final result and edit the layer masks as necessary.

Twitter Delicious Facebook Digg Stumbleupon Favorites More

 
Design by Free WordPress Themes | Bloggerized by Lasantha - Premium Blogger Themes | JCpenney Printable Coupons